Can You Lay SPC Flooring Over Old Tiles?
Tired of cold, outdated tile floors — but dreading the dust, noise, and disruption of a full demolition? Good news: you don’t need to tear anything out. Installing SPC flooring directly over existing tiles is not only possible, it’s one of the smartest renovation choices available today.
Short answer: Yes — and if your tiles pass a few simple checks, it’s easier than you think.
This guide covers everything you need to know, from assessing whether your floor qualifies, to a step-by-step installation walkthrough, to the most common mistakes that cause DIY projects to fail.
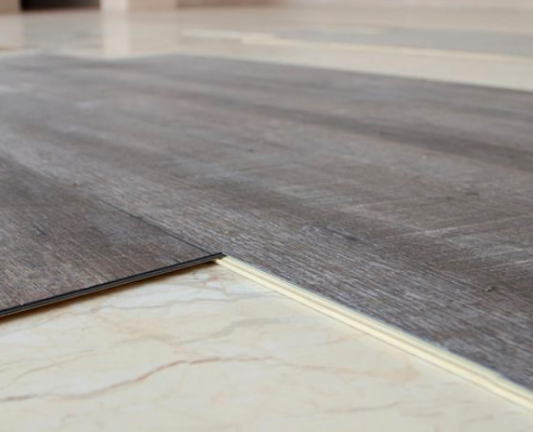
Table of Contents
Why Are Ceramic Tiles Considered The “Perfect Base” For SPC Flooring?
Understanding the principles behind it before you begin will give you more confidence. A ceramic tile base offers several unique advantages:
- Extreme flatness and strength: The leveling process itself requires ceramic tiles, providing a rigid, non-deforming “skeleton” for the SPC flooring. This effectively prevents squeaking or floor sagging caused by a weak base.
- Saves significant time, labor, and cost: Skipping the most painful demolition step saves you significant labor costs, waste removal fees, and time. The entire process is dry, dust-free, and noise-free.
- A perfect match for floating installation: SPC flooring uses a click-lock system for floating installation, requiring no glue. The flat ceramic tile surface provides ideal conditions for this, allowing for immediate walking and use after installation, seamlessly integrating into your new life.
How Much Will the Floor Height Increase?
This is a practical question that surprisingly few installation guides address directly. Here is a realistic breakdown:
| Layer | Typical Thickness |
| Moisture barrier / underlay | 1–2 mm |
| SPC flooring panel | 4–6 mm (residential grade) |
| Total increase | 5–8 mm |
A 5–8mm rise is manageable in most spaces, but it has real implications you should plan for before starting:
Interior doors. If your doors currently clear the tile surface by less than 8mm, they will need to be trimmed at the bottom. This is a straightforward task with a hand saw, but it needs to be done before installation — not after.
Door thresholds and transition strips. Every doorway between rooms — or between the SPC area and an adjacent floor covering — will need a transition strip. T-shaped or ramp-profile strips are standard. Measure the height difference at each transition point and select the appropriate profile.
Kitchen plinths and furniture legs. Freestanding kitchen units and appliances with fixed feet may sit slightly lower relative to the counter height. In most cases this is invisible, but it is worth checking in advance if your kitchen has a precise fitted finish.
Underfloor heating thermostats and pipe entry points. If pipes or conduit penetrate the floor at specific heights, confirm that the new finished floor level still clears them correctly.
Pre-installation Checks Determine Success Or Failure
Starting blindly is the beginning of failure. Here are three essential checks that must be completed before starting:
Checking the “Health” of the Tile Substrate
- Method: Tap each tile with a coin or a hollow-sounding hammer and listen to the sound. A hollow sound indicates a hollow area.
- Standard: All tiles must be secure, without looseness or serious cracks. Any loose tiles must be repaired and secured first, otherwise, it may cause the SPC flooring’s locking system to break under stress and produce abnormal noises later.
Testing the Absolute Flatness of the Floor
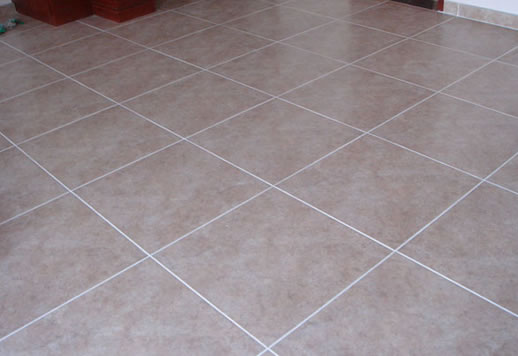
- Tools: A 2-meter straightedge or spirit level.
- Method: Place the straightedge at multiple locations on the floor and observe the gap between the straightedge and the floor.
- Standard: Within a 2-meter range, the difference in height should not exceed 3 millimeters. If the tile joints (grout) are raised, or if a tile has settled, it is necessary to first level the entire floor using self-leveling cement. This is to prevent long-term stress on the locking system, which could damage the floor.
Thorough Cleaning and Dusting
- Reason: Even the smallest grit can be a “hidden killer” for SPC flooring, causing a “scratching” sound when walked on and potentially abrading the backing layer.
- Method: Use a high-powered vacuum cleaner to thoroughly vacuum, paying special attention to the tile grout lines. If there are oil or wax stains, clean them with a cleaning agent.
Core Practical Guide: 5 Steps to Install SPC Flooring
Install like a pro by following these steps:
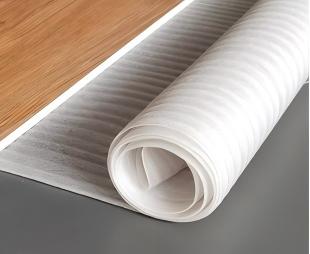
Step 1: Install the moisture barrier (Highly recommended)
- Purpose: While tiles don’t absorb moisture, the moisture barrier provides extra cushioning, noise reduction, and moisture protection, and can compensate for minor unevenness.
- Selection: Choose a thin moisture barrier less than 2mm thick. Lay it with joints and seal the seams with tape.
Step 2: Layout Direction
Golden Rule: Aligning the long edge of SPC flooring to the direction of light in the room, such as a window or the long wall of the room will maximize the sense of space.
Step 3: Install and interlock the core technology
- Insert 8-10mm expansion joints spacers starting at the upper left corner.
- Insert the second board at an angle (15-30 degrees is normal) and then press it flat. It’s locked when you hear a crisp “click”.
- Long-side splicing. After you have completed the first row of boards, align the long edge of the next board to the first row and insert it in the same way. Press it flat.
Step 4: Staggered Seam Splicing and Cutting
- Purpose: To stagger seams and distribute them evenly. This will enhance stability overall, as well as create a natural look.
- Method: Use the remainder of the first row to make the first board in the second row. The length should be at least 30 cm.
Step 5: Install baseboard and edge trim
- Doorway/threshold – Use T-shaped edge trimming for transition and fixing.
- Install a new baseboard over the expansion joint if the old one has been removed. If not, you can use an L-shaped or an F-shaped trim to finish the wall edge.
When NOT to Install Over Existing Tiles
Overlaying SPC flooring on a compromised tile base is the single biggest cause of installation failure. Before you commit to this approach, rule out the following situations:
- More than 20–30% of tiles are hollow or loose. Tap each tile with a coin or knuckle. A dull, hollow sound means the tile has separated from the adhesive beneath it. A few isolated hollow tiles can be re-secured; if the problem is widespread, the tile base is structurally unreliable and should be removed before proceeding.
- Tiles are cracked, chipped, or uneven at the joints. Raised grout lines or tiles that have shifted at different heights create an uneven surface. If the variation exceeds 3mm over a 2-meter span and cannot be corrected with self-leveling compound, the substrate is not suitable.
- The tile surface is heavily waxed, oiled, or coated. Residue on the tile surface can interfere with the underlay and create a slippery interface beneath the SPC. These surfaces require thorough cleaning — or removal — before installation.
- There is active moisture intrusion or rising damp. SPC itself is 100% waterproof, but moisture trapped beneath it has nowhere to go. Over time, standing moisture leads to mold, odors, and damage to the subfloor structure. If you detect damp patches, efflorescence (white salt deposits), or persistent musty smell, resolve the moisture issue first.
- You are in a space with strict height-clearance requirements. Adding any flooring layer raises the finished floor level. In some situations — particularly where door clearance, stair nosings, or plumbing fixtures are tightly constrained — the height increase may not be acceptable. See the next section for exact figures.
5 Common Installation Mistakes
Many DIY installation failures stem from neglecting the following points:
- Neglecting subfloor preparation: Installing directly on loose or uneven tiles is the root of all problems, leading to squeaking, broken click locks, and a host of other issues.
- Not leaving expansion joints: For the sake of “aesthetics,” the flooring is installed flush against the wall. SPC flooring expands and contracts with temperature changes; failing to leave sufficient expansion joints (8-10mm) will inevitably cause warping later.
- Perfunctory cleaning: Leaving sand and dust behind. The consequence is a constant “sanding” noise underfoot, no matter how lightly you walk.
- Installation in a moist environment: excessive moisture in the environment or ground. While SPC itself is waterproof, trapped moisture beneath the floor can still cause mold over time.
- Hammering the click locks with excessive force: If you encounter uneven joints, use excessive force when using a hammer. The click lock base can be easily broken, making the flooring useless. Check for foreign objects and align the angles properly.
Frequently Asked Questions (FAQ)
Q: Can SPC be installed over tile floors with underfloor heat?
A: Yes, SPC flooring is highly compatible with underfloor heating systems. The procedure is quite strict: before installation, the underfloor heating should be off, and the floor cooled down to room temperature. That will take a minimum of 48-hours. After installation, the temperature can be raised only gradually during the next 24 hours, with a maximum of 5°C per day.
Q: Is it necessary to remove my existing tile baseboards before installing new ones?
A: You have two options. The best way to achieve the best look is to first remove the old baseboards and install the flooring. It is also possible to use edge trim instead of removing them. This is convenient, and it works.
Q: How should I handle the damp areas at the kitchen and bathroom entrances?
A: It is important to seal properly. Seal the joint between SPC flooring, and the threshold stone with a high-quality waterproof sealant. This will prevent moisture from entering the subfloor or adjacent rooms.
Installing SPC over tiles is an excellent and cost-effective option. If you follow this guide’s inspection steps, installation instructions, and potential pitfalls, you will have a successful flooring renovation.